

What Is Worm best worm bin setup options Compost compost accelerator compost troubleshootinging bokashi composting for meat and dairy and Why Should You Try It?
You've been tossing banana peels, coffee grounds, and vegetable scraps into the trash for years — and every time, you wonder if there's a better way. There is, and it fits under your kitchen sink. Worm composting (vermicomposting) uses red wiggler worms red wiggler worms vs earthworms to transform your food scraps into one of the richest soil amendments on the planet how worm castings compare to other soil amendments, right inside your home, with almost no smell and surprisingly little effort. what to feed composting worms why banana peels work in vermicompost but not as banana peel water
Here's what makes vermicompost special: research from Cornell Waste Management Institute shows that finished vermicompost contains 1.5–2x higher microbial biomass than traditional compost, with 2–3 times more humic substances that help your soil hold water and nutrient organic fertilizer options for your gardens. And according to the EPA, food waste makes up 24% of landfill material — more than any other single category. A simple worm bin can divert 40–60% of your household food waste from the landfill and turn it into garden gold.
What you'll learn in this guide:
- Which worm species to use and how many you actually need for your household size
- How to set up a worm bin in 5 steps — for under $30 and in about 2 hours
- What to feed your worms (and the foods that will cause problems)
- How to troubleshoot the 4 most common beginner mistakes: odor, fruit flies, worm escape, and overfeeding
- When and how to harvest finished vermicompost for your garden
- The permaculture permaculture in small spaces principle that makes vermicomposting a game-changer for soil health
Key Takeaway
Worm composting is the easiest way to turn kitchen scraps into nutrient-rich fertilizer at home. A pound of red wiggler worms (about 1,000 individuals) processes half their body weight in food waste every day, producing vermicompost with NPK ratios averaging 1.0–1.5 : 0.5–0.8 : 0.5–1.0 — significantly more bioavailable than traditional compost.
Which Worms Do You Need for Vermicomposting?
Not just any earthworm earthworms in garden soil will work. The species you want is Eisenia fetida, commonly called red wigglers — and there's a good reason they're the gold standard for worm composting.

Red wigglers are surface-dwelling worms that naturally live in the top few inches of decaying organic matter — exactly the environment inside a compost bin. According to Cornell Composting, they thrive between 55–77°F (13–25°C), prefer a pH of 6.0–7.0, and consume roughly half their body weight in food scraps per day. A single worm produces 1–2 cocoons per week, with each cocoon hatching 2–6 baby worms — meaning your population can double every 3–4 months under good conditions.
You might also hear about European nightcrawlers (Eisenia hortensis). They're decent composters with better cold tolerance, but they process food 30–50% slower and prefer deeper, cooler bedding — not ideal for a household bin. Stick with red wigglers for indoor vermicomposting, as recommended by NC State Extension.
| Feature | Red Wigglers (E. fetida) | European Nightcrawlers (E. hortensis) |
| Processing rate | 0.5–1.0 lbs/lb/week | 0.3–0.5 lbs/lb/week |
| Ideal temperature | 55–77°F (13–25°C) | 50–68°F (10–20°C) |
| Bin depth preference | Shallow (8–12 inches) | Deep (12+ inches) |
| Reproduction rate | Doubles every 3–4 months | Doubles every 5–6 months |
| Best for | Indoor household bins | Outdoor windrow systems |
Sources: Cornell Composting, Oregon State Extension, NC State Extension
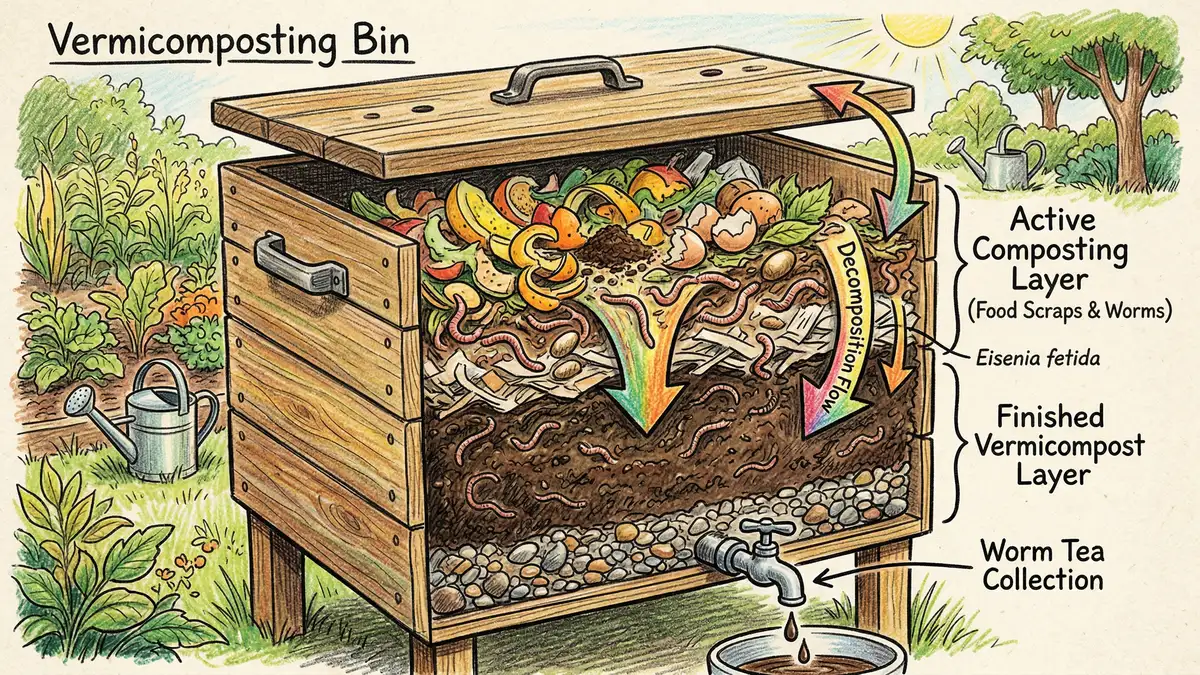
How Do You Set Up a Worm Composting Bin?
Setting up your first vermicomposting bin takes about 2 hours and costs $15–$30 if you go the DIY route with a plastic storage tote. Here's exactly what you need and how to put it together.
Choose Your Bin
Get an opaque plastic storage tote (10–14 gallons for a 1–2 person household, 18–24 gallons for 3–4 people). The bin should be at least 12 inches (30 cm) deep with a tight-fitting lid. Drill six ½-inch holes around the upper sides for airflow and six ¼-inch holes in the bottom for drainage. Place the bin on a tray to catch any liquid.
Prepare the Bedding
Shred newspaper or cardboard into 1-inch strips — this is your carbon-rich base. Mix 50–60% shredded paper, 20–30% aged compost or garden soil, and 10–15% coconut coir for moisture retention. Aim for a carbon-to-nitrogen ratio of 20:1 to 30:1. Moisten until it feels like a wrung-out sponge (50–70% moisture). Fill the bin 6–8 inches (15–20 cm) deep.
Add Your Worms
Start with 1 pound of red wigglers per square foot of bin surface area — about 1,000 worms per pound. For a standard 2' × 2' bin, that's 4 pounds of worms. Place them gently on top of the bedding and let them burrow in. Don't feed them for the first 2 weeks — they need time to settle in, as recommended by NC State Extension.
Start Feeding (Week 3)
Begin with small amounts — about ¼ pound per pound of worms. Bury food scraps 2–3 inches beneath the bedding surface (this prevents fruit flies). Gradually increase over 4–6 weeks until you reach full capacity: 0.5–1.0 pounds of food waste per pound of worms per week.
Monitor and Maintain
Check weekly: the bedding should stay moist (squeeze test — 1–2 drops of water), temperature between 55–77°F (13–25°C), and no strong odors. Add a handful of shredded paper if things get too wet. Your worms will quietly process your scraps for 4–6 months before the first harvest.
Why This Works: Closed-Loop Nutrient Cycling
When you set up a worm bin, you're creating what permaculture designers call a closed-loop nutrient cycle — one of the core principles Bill Mollison outlined in Permaculture: A Designers' Manual. Your kitchen scraps (solar energy stored in plant matter) are converted by worms and microbes into plant-available nutrients, which feed your garden, which produces food, which creates scraps that go back into the bin. Nothing leaves the system. In permaculture terms, this is a Zone place your worm bin in Zone 1 1 integration — a high-input, high-output system right next to your kitchen that turns a waste stream into a resource stream.
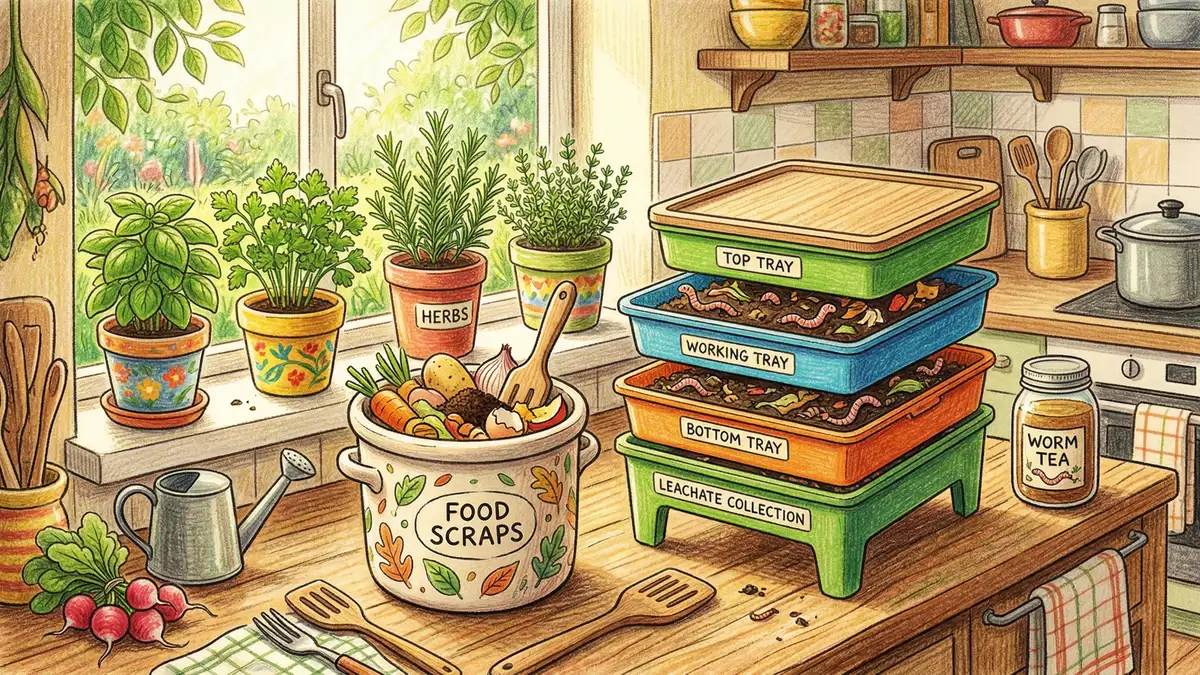
What Can You Feed Composting Worms?
Red wigglers eat most fruit and vegetable scraps, but there are some important exceptions. Getting the feeding right is the single biggest factor in whether your bin stays healthy or starts to smell. If you're already familiar with what you can compost in a traditional pile, the worm bin list is a bit more specific.
Feed these freely: fruit and vegetable peels, cores, and scraps; coffee grounds and unbleached paper filters; tea leaves and bags; crushed eggshells (calcium source and grit for digestion); small amounts of stale bread or plain pasta; shredded newspaper and cardboard (carbon source).
Avoid these entirely: meat, fish, dairy, and oils (attract pests, create anaerobic conditions); excessive citrus (depresses pH below 5.5); onions and garlic (antimicrobial compounds harm beneficial bacteria); glossy or colored paper (potentially toxic inks); diseased plant material (pathogens survive in vermicompost).
Common Mistake: Overfeeding Your Worm Bin
The number one beginner mistake is adding too much food too fast. If you see uneaten food sitting on top after 5–7 days, a vinegary smell developing, or worms clustering at the lid, you're overfeeding. Cut back by 50% for 2–3 weeks and add a layer of dry shredded paper to absorb excess moisture. A healthy bin should have a mild, earthy smell — like forest soil after rain.
Get Our Free Companion Planting Chart
Join 10,000+ gardeners getting weekly tips on what to plant together, soil health, and permaculture techniques.
Send Me the Chart
Why Is Vermicompost Better Than Regular Compost?
If you're already composting at home, you might wonder why worm composting is worth the extra setup. The answer comes down to biology. According to research cited by Cornell Waste Management Institute, vermicompost contains 6–12 billion bacteria per gram compared to 2–4 billion in traditional compost, plus significantly higher populations of plant growth-promoting rhizobacteria (beneficial microbes that help roots absorb nutrients).
| Nutrient | Vermicompost | Traditional Compost | Advantage |
| Nitrogen (N) | 1.0–1.5% | 0.5–1.0% | 40–80% more bioavailable |
| Phosphorus (P) | 0.5–0.8% | 0.3–0.5% | 2–3x faster plant availability |
| Potassium (K) | 0.5–1.0% | 0.4–0.8% | Slightly elevated |
| Humic acid content | 7.5–15.0% | 2–4% | 2.5–3.8x more |
| Microbial biomass | 6–12 billion/gram | 2–4 billion/gram | 3x higher |
Sources: Cornell Waste Management Institute, Ohio State University Extension
In practical terms, field trials show vermicompost-amended soil produces 23–31% higher tomato yields, 18–27% higher lettuce yields, and 26–35% higher strawberry yields compared to unamended soil. Those benefits persist across 2–3 growing seasons as the microbial community establishes itself in your garden soil.
Key Takeaway
Vermicompost isn't just "good compost" — it's a fundamentally different product. The worm gut transforms food waste into a biologically active soil amendment with higher nutrient bioavailability, more beneficial microbes, and disease-suppressive properties that traditional hot composting doesn't produce at the same level.
How Do You Troubleshoot Common Worm Bin Problems?
Even well-managed bins occasionally need adjustments. Here are the four most common issues and exactly how to fix them.
Odor (vinegary or sour smell): This means anaerobic pockets have formed — usually from overfeeding or excess moisture. Increase airflow by fluffing the bedding gently with a fork, add a generous layer of dry shredded paper, and reduce feeding by 50% for 2 weeks. A healthy bin smells like damp earth, nothing stronger.
Fruit flies: Drosophila species lay eggs on exposed food scraps. The fix is prevention: always bury food 2–3 inches (5–8 cm) beneath the bedding surface and cover with a layer of dry paper. For existing infestations, set a trap — a half-pint jar of apple cider vinegar with a few drops of dish soap near the bin. The infestation clears within 2–3 weeks.
Worm escape: If worms are crawling up the sides or clustering on the lid, something is wrong with bin conditions — usually temperature extremes (above 82°F / 28°C or below 50°F / 10°C), overly wet bedding, or low pH from too many acidic scraps. Check and correct the primary issue. A handful of crushed eggshells helps buffer pH.
Slow processing: If food sits untouched for more than a week, your worm population may be too small, the temperature too low, or the bedding too dry. The Oregon State Extension recommends worms thrive between 55–77°F — if your bin is in an unheated garage in winter, move it to a warmer spot.
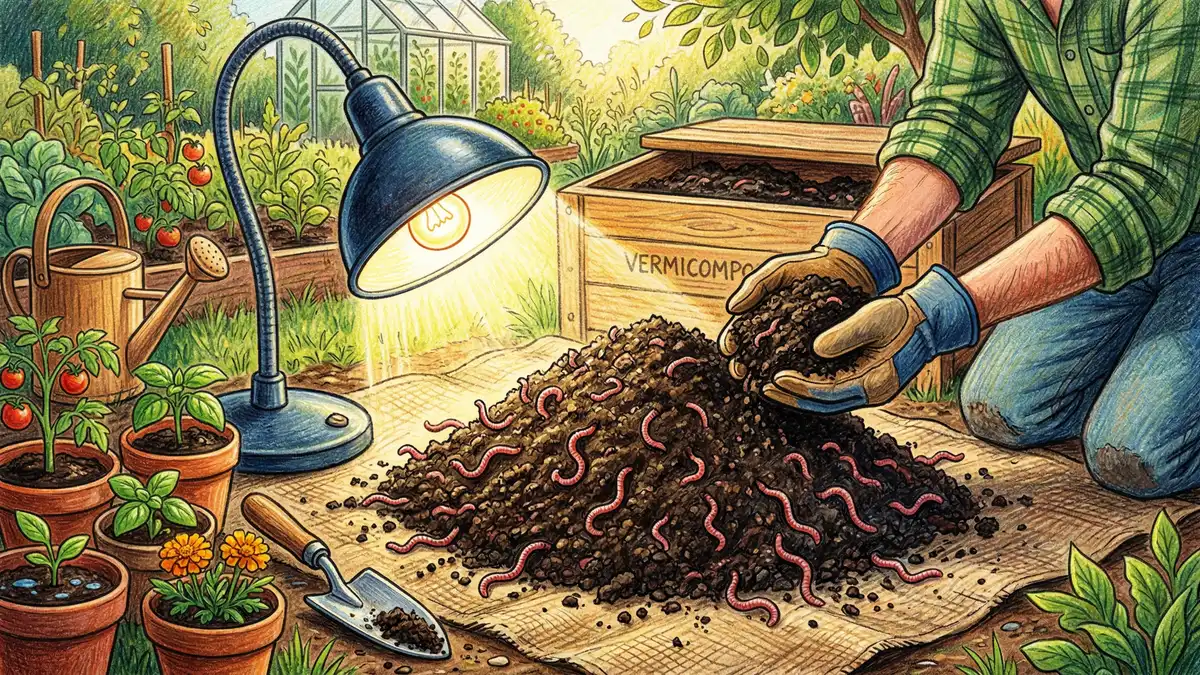
How Do You Harvest Finished Vermicompost?
Your first harvest comes 4–6 months after setup. You'll know it's ready when the bottom of the bin contains dark, crumbly material that looks like rich soil and smells earthy — with no recognizable food pieces. Here are the two best methods for beginners.
The light method (easiest, 1–2 hours): Dump the bin contents onto a tarp under a bright light. Form small cone-shaped mounds. Red wigglers hate light and will burrow to the center within 10–15 minutes. Scrape away the outer layer of finished vermicompost (worm-free), reshape the mound, and repeat. You'll recover 85–95% of your worms. As noted in Mary Appelhof's foundational book Worms Eat My Garbage, this method has been the go-to for home vermicomposters since the 1980s.
The migration method (hands-off, 3–4 weeks): Stop feeding one side of the bin. Add fresh bedding and food only to the other side. Over 3–4 weeks, worms migrate toward the food, leaving behind finished compost that's 90–98% worm-free. This works especially well with tiered stacking systems. A 4-square-foot bin yields about 25–50 pounds (11–23 kg) of finished vermicompost per year — enough to amend several raised beds or container gardens.
Why This Works: The Soil Food Web
When you add vermicompost to your garden, you're not just adding nutrients — you're inoculating your soil with a living ecosystem. The late Dr. Elaine Ingham's research at the Soil Food Web School demonstrated that healthy soil depends on a thriving web of bacteria, fungi, protozoa, and nematodes. Vermicompost delivers all of these in concentrations far higher than traditional compost, essentially jumpstarting the soil food web that permaculture practitioners work to build. It's why a handful of vermicompost can transform a tired garden bed in a single season.
Frequently Asked Questions
What is vermicomposting and how is it different from regular composting?
Vermicomposting uses red wiggler worms (Eisenia fetida) to break down food scraps in a contained bin, while traditional composting relies on heat-generating microbial activity in an outdoor pile. The key difference is the end product: vermicompost contains 3x more beneficial microbes and 2.5–3.8x more humic substances than traditional compost, making it more effective at improving soil structure and plant nutrition. It's also odor-free, works indoors, and requires a much smaller footprint — perfect for apartment composting in an apartment gardeners and anyone without yard space.
How many worms do I need to start worm composting?
Start with 1 pound of red wigglers (about 1,000 worms) per square foot of bin surface area. For a 1–2 person household, a 2' × 1' bin with 2 pounds of worms handles about 1–2 pounds of food waste per week. A family of four typically needs a 2' × 2' bin with 4 pounds of worms. The worm population self-regulates based on available food — they'll double every 3–4 months if conditions are good, as outlined by Oregon State Extension.
Can you use worm castings and fertilizer together?
Yes, and it's often a smart combination. Vermicompost provides slow-release nutrients and biological activity, while targeted fertilizers can address specific deficiencies. Research shows that soil amended with vermicompost at 25–50% by volume produces 15–30% higher yields than unamended soil even without additional fertilizer. If you do add fertilizer, reduce the rate by about one-third since vermicompost already supplies significant nitrogen, phosphorus, and potassium.
Do worm composting bins smell bad?
A properly maintained worm bin smells like damp forest soil — mild and earthy. If you detect a vinegary or sour smell, it means the bin is too wet or overfed, creating anaerobic conditions. The fix is simple: add dry shredded paper, improve airflow, and cut feeding in half for two weeks. Burying food scraps beneath the bedding surface also prevents odor and discourages fruit flies. Many vermicomposters keep their bins in the kitchen, laundry room, or basement without any issues.
How long does it take to get usable vermicompost how long different composting methods take?
Expect your first harvest at 4–6 months after setup, with steady-state harvests every 3–4 months after that. A standard 4-square-foot bin produces 25–50 pounds (11–23 kg) of finished vermicompost annually. You'll know it's ready when the material at the bottom is uniformly dark brown to black getting the brown-to-green ratio right, crumbly in texture, and free of recognizable food pieces. The companion planting combinations in your garden will thank you — vermicompost-fed soil supports stronger root development and healthier plant communities.
Ready to Grow Smarter?
Get our free 20-page beginner's guide to backyard food forests. Two printable worksheets, a year-by-month food-forest calendar, and a curated reading path.
Download the Free GuideResources
- Cornell Composting — Worm Composting Basics
- Oregon State Extension — Composting with Worms
- NC State Extension — Vermicomposting for Households
- Cornell Waste Management Institute — Vermicompost: A Living Soil Amendment
- Ohio State University Extension — Getting Started with Vermicomposting (PDF)
- EPA — Food: Material-Specific Data
- Worm Woman — Mary Appelhof and "Worms Eat My Garbage"
- Soil Food Web School — Dr. Elaine Ingham's Soil Biology Research


