

What Are Red Wiggler Worms and Why Do Gardeners Love Them?
You have a bucket of kitchen scraps, a desire to stop sending food waste to landfill, and a nagging question: which worms should you actually buy? If you have searched for "composting worms" online, you have probably encountered red wigglers, nightcrawlers, European nightcrawlers, and a confusing tangle of Latin names. Choosing the wrong species is the single most common reason new vermicomposters fail — and it is entirely preventable. worm composting for kids
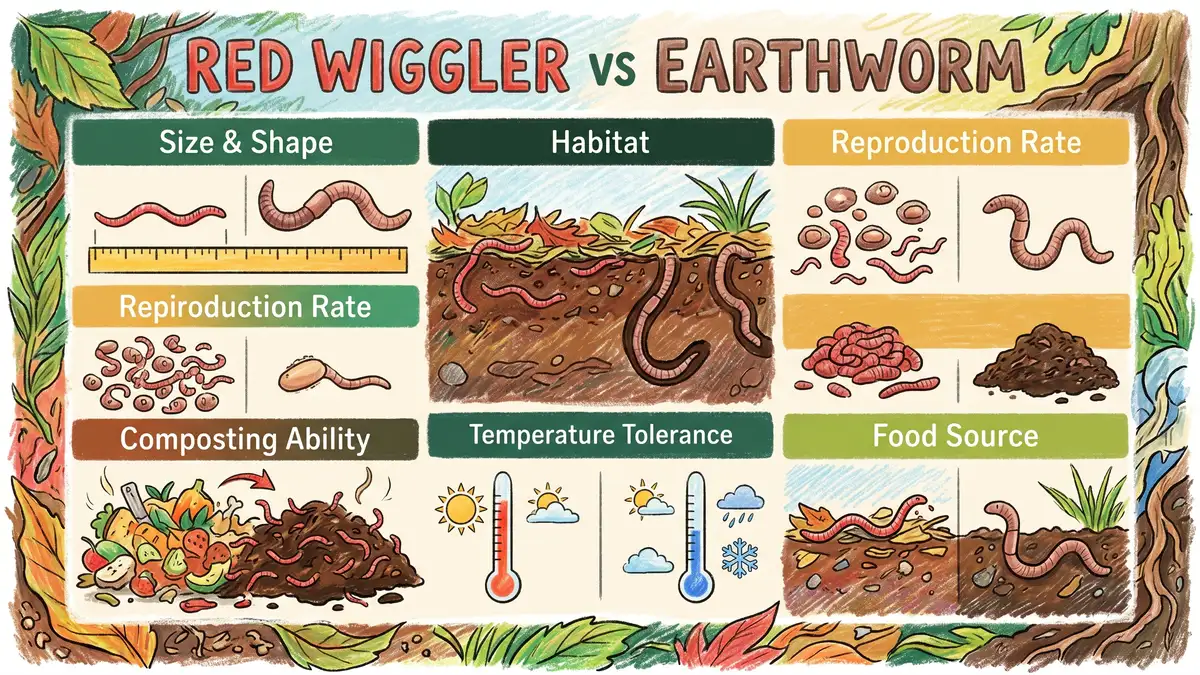
Red wiggler worms (Eisenia fetida) are surface-dwelling decomposers that thrive in confined, managed bins. They process roughly 50% of their body weight in food waste every week and reproduce fast enough to double their population in 60 to 90 days, according to data from Cornell Cooperative Extension. Common garden earthworms, by contrast, are deep burrowers that improve soil structure but will escape or die in a worm bin within weeks. Understanding this distinction before you spend a single dollar is the key to vermicomposting success.
What you will learn in this guide:
- The biological differences between red wigglers and common earthworms — and why they cannot be swapped
- How to choose the right species for your specific goal (bin composting vs. garden soil improvement)
- Step-by-step setup for a red wiggler bin that starts producing nutrient-rich castings in 4 to 6 months
- The exact mistakes that kill worm populations — temperature, feeding, and bedding errors with fixes
- Why vermicast outperforms traditional compost on every nutrient metric that matters
Key Takeaway
Red wigglers are bin composters; common earthworms are soil builders. They fill completely different ecological roles. Placing the wrong species in the wrong environment leads to 80–90% mortality within 4 weeks. Match the worm to the job, and both will thrive.
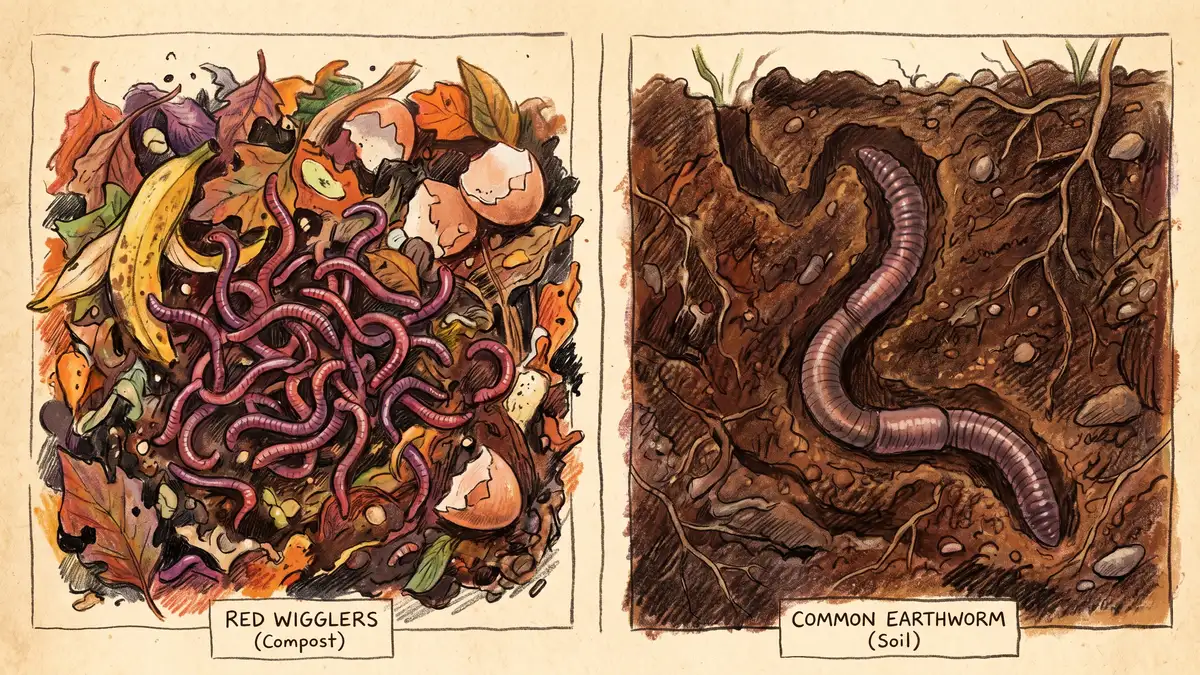
How Are Red Wigglers Different from Common Earthworms?
The difference comes down to where they live and what they eat. Red wigglers (Eisenia fetida) are epigeic — surface-dwelling worms that live in the top 2 inches (5 cm) of decaying organic matter. They cluster in rotting leaves, manure piles, and compost bins, feeding on decomposing material rather than mineral soil. Common garden earthworms like the Canadian nightcrawler (Lumbricus terrestris) are anecic — deep burrowers that tunnel 12 to 24 inches (30–60 cm) into the earth, pulling surface litter down into vertical channels.
This is not a minor lifestyle preference — it is a fundamental biological specialisation. Red wigglers placed in open garden soil experience 80–90% mortality within 3 to 4 weeks because they cannot burrow deep enough to escape temperature swings, desiccation, and predators. Nightcrawlers placed in a worm bin will attempt to escape immediately because their burrowing instinct demands deep soil that a shallow bin cannot provide.
| Characteristic | Red Wiggler (Eisenia fetida) | Common Earthworm (Lumbricus terrestris) |
| Adult size | 3–4.5 inches (7–11 cm) | 6–8 inches (15–20 cm) |
| Habitat zone | Surface (0–2 inches / 0–5 cm) | Deep soil (12–24 inches / 30–60 cm) |
| Ecological type | Epigeic (litter dweller) | Anecic (deep burrower) |
| Reproduction rate | 1 cocoon every 7–10 days | 1 cocoon every 21–28 days |
| Population doubling | 60–90 days | 6–12 months |
| Best use | Worm bin composting | Garden soil aeration |
| Bin survival | Excellent (thrives in confinement) | Poor (escapes or dies) |
| Garden soil survival | Poor (80–90% die within 4 weeks) | Excellent (natural habitat) |
Sources:
Why This Works: Niche Partitioning
In permaculture, every element in a system fills a specific niche. Red wigglers and earthworms are a textbook example of niche partitioning — two related organisms that evolved to occupy completely different ecological roles. Red wigglers specialise in rapid decomposition of fresh organic matter at the surface. Earthworms specialise in deep soil engineering. When you match each species to its niche, both perform at their peak — and your garden benefits from both nutrient-rich castings and well-structured soil.
What Makes Red Wigglers the Best Composting Worm?
Red wigglers dominate vermicomposting for three reasons: appetite, reproduction, and tolerance. A mature red wiggler consumes approximately 7% of its body weight daily — roughly half its weight each week, according to UC Davis. That means 1,000 worms (about 1 pound / 450 g) will process roughly 1 pound (450 g) of kitchen scraps per week.
Their reproduction rate is equally impressive. Each adult produces 1 cocoon every 7 to 10 days, with each cocoon hatching 2 to 8 juveniles. New worms reach sexual maturity in just 6 to 8 weeks. Under good conditions, your starting population will double in 60 to 90 days — meaning that 1-pound starter colony becomes 2 pounds (900 g) in about 3 months without buying a single additional worm.
Red wigglers also tolerate a wider range of conditions than most composting species. They handle pH levels from 5.0 to 9.0 (optimal 6.8–8.0), moisture levels from 60–80%, and temperatures from 59°F to 77°F (15–25°C). That tolerance makes them forgiving for beginners who are still learning to manage bin conditions.
Which Worm Species Should You Choose for Your Goal?
Your choice depends entirely on what you are trying to accomplish. If you want to compost kitchen scraps in an indoor or outdoor bin, red wigglers are the clear winner. If you want to improve the structure and drainage of your garden beds, you want earthworms already living in your soil — and the best way to attract them is by adding organic matter, not by buying them. Here is the full decision breakdown.
| Your Goal | Best Species | Why |
| Indoor bin composting | Red wiggler (Eisenia fetida) | Surface feeder, thrives in confinement, fast reproduction |
| Outdoor bin composting | Red wiggler (Eisenia fetida) | Same advantages; insulate bin if temps drop below 50°F (10°C) |
| Garden soil improvement | Canadian nightcrawler (Lumbricus terrestris) | Deep burrowing creates drainage channels; improves water infiltration by 10–40% |
| Both composting and garden use | Hybrid system: red wigglers in bin + earthworms in soil | Red wigglers produce castings; apply castings to garden where earthworms thrive |
| Fishing bait + composting | European nightcrawler (Eisenia hortensis) | Larger than red wigglers; moderate bin survival; good dual-purpose option |
Sources:
Common Mistake to Avoid
Do not buy "garden worms" or "nightcrawlers" for your worm bin. Garden earthworms (Lumbricus terrestris) will attempt to escape immediately and die within 2 to 4 weeks in a confined bin. Always confirm the species name with your supplier — you need Eisenia fetida (red wigglers) for vermicomposting. If a seller cannot tell you the Latin name, find a different supplier.
How Do You Set Up a Red Wiggler Worm Bin?
A basic worm bin takes about 30 minutes to set up and costs under $30 (£25) if you use a plastic storage tote. The Cornell Cooperative Extension recommends a shallow container — approximately 24 × 18 × 8 inches (60 × 45 × 20 cm) — because red wigglers are surface dwellers that prefer the top 6 inches (15 cm) of bedding.
Choose Your Container
Use a 10- to 14-gallon (40–55 L) opaque plastic tote with a lid. Drill 20 to 30 small holes (1/8 inch / 3 mm) in the lid and upper sides for ventilation. Drill 6 to 8 drainage holes in the bottom. Place the bin on a tray to catch any excess moisture. A standard tote from any hardware store works perfectly — no need for expensive speciality bins.
Prepare the Bedding
Fill the bin 3/4 full with shredded newspaper, cardboard, or coconut coir. Moisten until it feels like a wrung-out sponge — damp but not dripping. The bedding should be pH 6.5–7.5. Avoid pine shavings or cedar (too acidic and potentially toxic). Add a handful of garden soil or finished compost to introduce beneficial microbes.
Add Your Red Wigglers
Start with 1 pound (450 g) of red wigglers — roughly 1,000 worms — for a standard-sized bin. Spread them on top of the bedding and leave the lid off under a light for 20 minutes. Red wigglers are negatively phototactic (they avoid light), so they will burrow into the bedding on their own.
Start Feeding (Slowly)
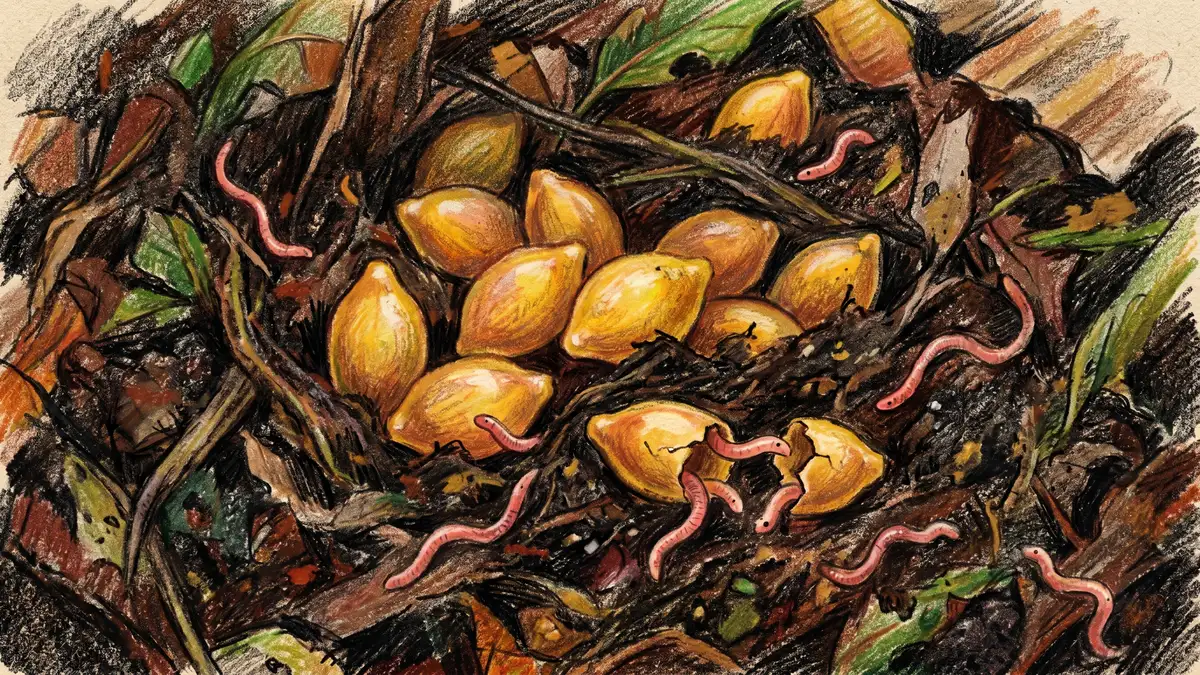
Wait 3 to 5 days before your first feeding to let the worms acclimate. Then add about 1 pound (450 g) of fruit and vegetable scraps per week — buried under the bedding, not left on top. Avoid meat, dairy, oils, and excessive citrus. Chop scraps into small pieces to speed decomposition.
Maintain and Harvest
Keep the bin at 59–77°F (15–25°C) in a dark, well-ventilated location. Check moisture weekly — add dry bedding if too wet, spritz with water if too dry. Your first harvest of finished worm castings will be ready in 4 to 6 months. Push finished castings to one side, add fresh bedding and food to the other — the worms will migrate toward the food over 1 to 2 weeks.
Why This Works: Stacking Functions
In permaculture design, every element should serve multiple functions. A red wiggler worm bin does exactly that — it reduces kitchen waste, produces premium fertiliser, generates worm "tea" for liquid feeding, and creates a self-sustaining biological system that improves over time. One small bin under your kitchen sink quietly performs four jobs that would otherwise require a council composting service, store-bought fertiliser, and regular bin runs.
Get Our Free Companion Planting Chart
Join 10,000+ gardeners getting weekly tips on what to plant together, soil health, and permaculture techniques.
Send Me the ChartWhy Is Vermicast Better Than Regular Compost?

Worm castings outperform traditional compost on nearly every measurable metric. Vermicast typically contains 1.5–2.0% nitrogen compared to 0.5–1.5% in regular compost — that is up to 3 times more plant-available nitrogen per handful. Phosphorus levels run 0.8–1.0% versus 0.5–0.8% in traditional compost, and the nutrients are in more bioavailable forms that plants can absorb immediately.
The microbial advantage is even more striking. Vermicast contains 10 to 20 billion beneficial microorganisms per gram — bacteria, fungi, and protozoa — compared to 1 to 10 billion in traditional compost. These microbes continue working after you apply the castings, improving soil structure and suppressing plant diseases. The fine, uniform texture of vermicast also makes it safe to use directly on seedlings, where coarser compost might burn tender roots.
From a time perspective, vermicomposting produces usable material in 4 to 6 months, while a traditional compost pile typically takes 6 to 12 months. Red wigglers convert roughly 40–60% of input material into finished castings — a remarkably efficient biological process.
What Are the Biggest Mistakes That Kill Composting Worms?
Most worm bin failures come down to three preventable errors: temperature extremes, overfeeding, and wrong bedding. Understanding these before you start will save you money, frustration, and a bin full of dead worms.
Temperature is the number one killer. Red wigglers cannot survive below 41°F (5°C) or above 95°F (35°C). At low temperatures, ice crystals form in their tissues and cause irreversible damage within 24 to 48 hours. At high temperatures, proteins denature and mass mortality begins within a day. If your bin sits in an uninsulated garage that drops below freezing in winter or a sunny patio in summer, your worms are at serious risk. The fix: keep your bin indoors, in a basement, or in an insulated shelter year-round.
Overfeeding creates toxic conditions fast. When you add more food than your worms can process, uneaten scraps turn anaerobic and produce ammonia and hydrogen sulphide — both lethal to worms. This can happen in as little as 3 to 7 days after a single large feed. The rule of thumb from Oregon State Extension: feed only what your worms consume in one week. If food is still visible after 7 days, skip the next feeding.
Wrong bedding causes slow decline. Pine shavings, cedar chips, or soil-heavy bedding drops pH below the safe range (below 4.5) or compacts and suffocates the worms. Stick to shredded newspaper, cardboard, or coconut coir at pH 6.5–7.5. When properly maintained, red wigglers can live 2 to 3 years in a home bin — and up to 4 to 5 years under laboratory conditions.
Key Takeaway
The three survival rules for red wigglers: keep temperatures between 59–77°F (15–25°C), feed no more than 1 pound (450 g) per 1,000 worms per week, and use neutral-pH bedding (shredded cardboard or newspaper). Follow these three rules and your worm population will be self-sustaining within 6 months.
Can You Use Both Red Wigglers and Earthworms Together?
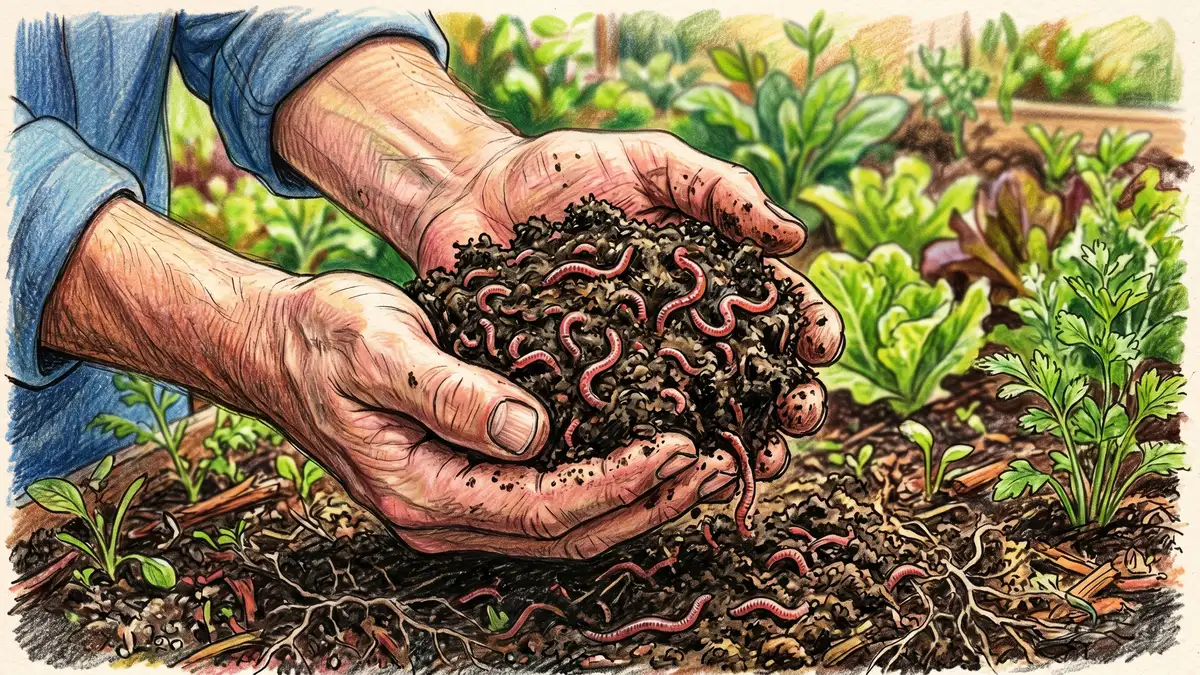
Yes — but not in the same container. The most effective approach is a hybrid system: red wigglers in a dedicated worm bin producing castings, and earthworms thriving naturally in your garden beds. You bridge the two systems by applying finished vermicast directly to your garden soil, where it feeds the earthworm population and supercharges their soil-building work.
This hybrid approach gives you the best of both species. Red wigglers rapidly process your kitchen waste into the most nutrient-dense compost available. Garden earthworms — which you do not need to buy, since they colonise healthy soil on their own — create deep burrow networks that improve water infiltration by 10–40% and pull organic matter deep into the soil profile. Charles Darwin documented that earthworms process 2 to 3 tonnes of soil per individual per year, and their castings contain 5 to 11 times more nitrogen than the surrounding soil.
A well-designed permaculture garden uses both systems together. The worm bin handles waste and produces a premium soil amendment. The garden soil provides the deep-structure engineering that no bin worm can replicate. Apply vermicast as a top dressing (1/4 inch / 6 mm) around plants or mix it into potting soil at a 10–20% ratio for container gardens.
Frequently Asked Questions
Can I put compost worms in my garden?
You can add red wigglers to garden beds, but they will not survive long-term in open soil. Red wigglers are surface-dwelling decomposers that need a consistent layer of decaying organic matter. In a heavily mulched raised bed with 3 to 4 inches (7–10 cm) of organic mulch, some may persist — but most will migrate or die within a few weeks. The better approach is to harvest their castings from a bin and apply those castings to your garden beds instead.
How many red wigglers do I need to start a worm bin?
Start with 1 pound (450 g), which is approximately 1,000 worms, for a standard 10- to 14-gallon (40–55 L) bin. This quantity can process about 1 pound (450 g) of food scraps per week. Under optimal conditions, the population will double in 60 to 90 days, so starting small is fine — the worms will catch up to your waste production within a few months.
Can compost worms survive winter?
Red wigglers cannot survive freezing temperatures. Below 41°F (5°C), they enter a stress state, and sustained exposure below 32°F (0°C) is lethal within 24 to 48 hours. If your bin is outdoors, insulate it heavily for winter or move it indoors. A basement, heated garage, or even under the kitchen sink works well. Some gardeners use straw bale insulation around outdoor bins in zones 6 and above to extend the season.
What temperature is too cold for worms?
Red wigglers become sluggish below 50°F (10°C) and stop feeding. Below 41°F (5°C), they experience significant stress and can die within 1 to 2 weeks. Below 32°F (0°C), mortality is rapid — within 24 to 48 hours. The optimal temperature range is 59–77°F (15–25°C). Keep a thermometer near your bin and take action any time temperatures drop below 50°F (10°C).
Can I put fishing worms in my garden?
It depends on the species. If your fishing worms are Canadian nightcrawlers (Lumbricus terrestris), they are native soil dwellers and will do well in garden beds — but they are poor composters in bins. If they are European nightcrawlers (Eisenia hortensis), they can work as an intermediate species for both light garden use and bin composting, though they perform less efficiently than red wigglers in bins. Always check the species before deciding where to place them. For dedicated worm composting, red wigglers remain the best choice.
Ready to Grow Smarter?
Get our free 20-page beginner's guide to backyard food forests. Two printable worksheets, a year-by-month food-forest calendar, and a curated reading path.
Read the Free GuideResources
- Cornell Cooperative Extension — Worm Composting Basics
- Cornell Cooperative Extension — Six Easy Steps to Setting Up a Worm Bin
- NC State Extension — Vermicomposting Overview
- Oregon State Extension — Composting with Worms (EM9034)
- UF IFAS Extension — Vermicomposting Guide
- UC Davis Magazine — How to Start a Vermicompost
- USDA NRCS — Soil Biology Primer
- USDA NRCS — Soil Quality Indicators: Earthworms


