

You've read about permaculture scaling a permaculture design to a community project is permaculture the same as sustainable agriculture Sepp Holzer cold-climate methods permaculture zones. You know it has something to do with guilds, swales, and zones — but when you stand in your backyard with a coffee in hand, the question that stops you cold is: where do I actually start? assess your site before planting Middle Eastern desert permaculture
The honest answer: not with a shovel. Permaculture design edge design and marginal spaces 10 mistakes first-year practitioners make low-cost permaculture design is a sequence, and the gardens that thrive are the ones whose designers resisted the urge to plant until they'd walked their land through at least one full season. This guide walks you through the 5-phase design process taught by Oregon State University's Introduction to Permaculture and refined by practitioners from David Holmgren to Eric Toensmeier's 1/10-acre Paradise Lot, so you can design your first system with confidence — whether you have a 30 ft × 30 ft suburban lot or a 5-acre homestead.
What Permaculture Design Actually Is
Permaculture design is the deliberate arrangement of plants, water, structures, and animals into a self-reinforcing system that produces food, builds soil, and gets easier to maintain over time. Aquaponics in permaculture fits neatly into a Zone 1 design. It isn't a garden style — it's a design methodology with its own ethics, principles, and tools, originally developed by Bill Mollison and David Holmgren in 1970s Tasmania.
The methodology rests on three ethics — Earth care, people care, and fair share — and 12 design principles that act as a checklist at every stage. If you're completely new to the philosophy, start with our practical guide to permaculture or the beginner's start-here page. This article assumes you know the basics — now you want to design.
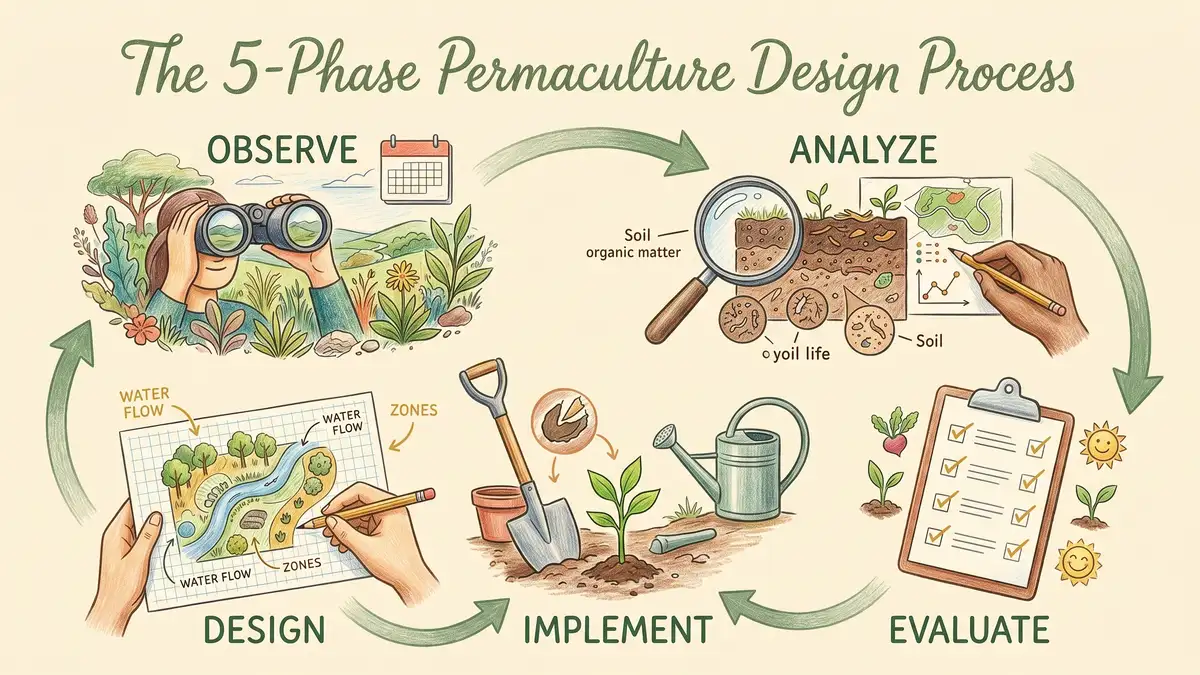
The 5-Phase Design Process
Most permaculture educators teach a 5- to 7-step cycle. We'll use five, because that's what a home gardener can realistically follow on a first project. Each phase has a clear output — don't skip ahead until you have it in hand.
Observe (3–12 months)
Walk the land in every season. Track sun, water, wind, frost, and wildlife. Output: a notebook full of dated observations and a rough base map.
Analyze (2–4 weeks)
Overlay your observations as sectors and zones. Test the soil. Output: a site analysis map showing forces (sun, wind, fire, noise) and use zones (1 through 5).
Design (4–8 weeks)
Draw the water plan first, then zones, then elements. Use tracing paper overlays so you can iterate. Output: a master plan drawing and a phased implementation schedule. Energy elements like a rocket mass heater fit naturally into that master plan.
Implement (over 3–7 years)
Build in stages — earthworks first, then trees, then understory, then annuals. Permaculture Apprentice's 9-step farm Geoff Lawton at Zaytuna Farm setup confirms implementation takes years, not weekends.
Evaluate & Tweak (ongoing)
At the end of every season, walk the system with your original plan. What worked? What didn't? Permaculture is iterative — your design year 3 will look different to year 1, and that's the point. Scaling a design to a whole community is exactly what Transition Towns do.
Sources: Making Permaculture Stronger — Holmgren design process, Permaculture Education — design process highlights, Permaculture Apprentice — farm setup in 9 steps.
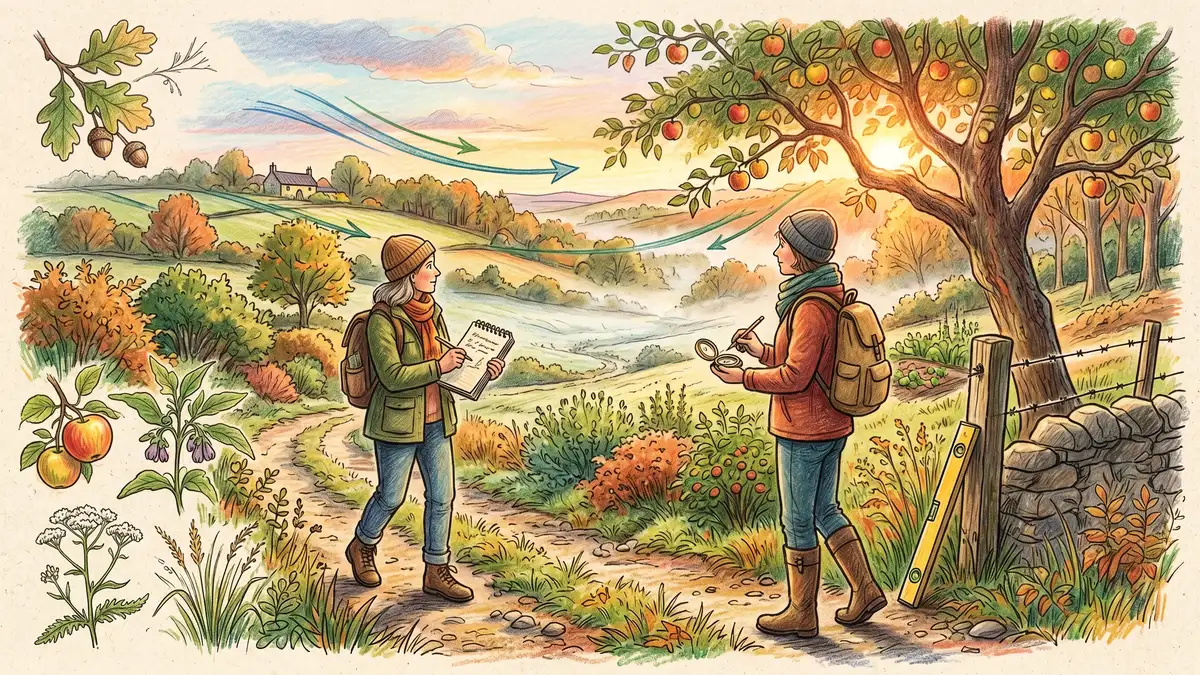
Phase 1: Observation — Why You Don't Plant for a Year
This is the phase most beginners skip, and it's the one Toby Hemenway's Gaia's Garden, the Permaculture Project, and Free Permaculture all hammer home: observe for a full year before installing anything permanent. You're looking for patterns you can only see by watching.
Walk the property at first light and at dusk. Note where morning sun hits first and where it never reaches. Watch which low spots hold frost in April while the rest of the yard is clear — that's a frost pocket, and you don't plant a tender fruit tree there. Mark where water pools after a hard rain, where winter winds cut through, and where neighbors' lights or noise intrude. Photograph the same corner of the property on the same day of every month.
Your output by the end of the year: a dated observation journal, a rough scale drawing of your property, and a gut-level feel for the land that no satellite photo can give you.
Why This Works: Observe and Interact
This is permaculture's first principle, and it's first for a reason. Every acre of land carries information — slope, wind, microclimate permaculture and climate changes, soil memory — that reveals itself only through time. Designing too fast means fighting patterns you haven't noticed yet. Observation isn't passive; it's the most actively productive phase of the entire project.
Phase 2: Sector & Zone Analysis
Once you've observed, you translate what you've seen into two overlays on your base map: sectors (forces coming at your site) and zones (how often you visit each area).
Sectors include sun angles at summer and winter solstice, prevailing wind direction, fire approach (if you're in a wildfire zone), view corridors, and noise. Tools like SunCalc let you verify solar angles at your exact latitude, and the NOAA Climate last-frost map sets your planting calendar.
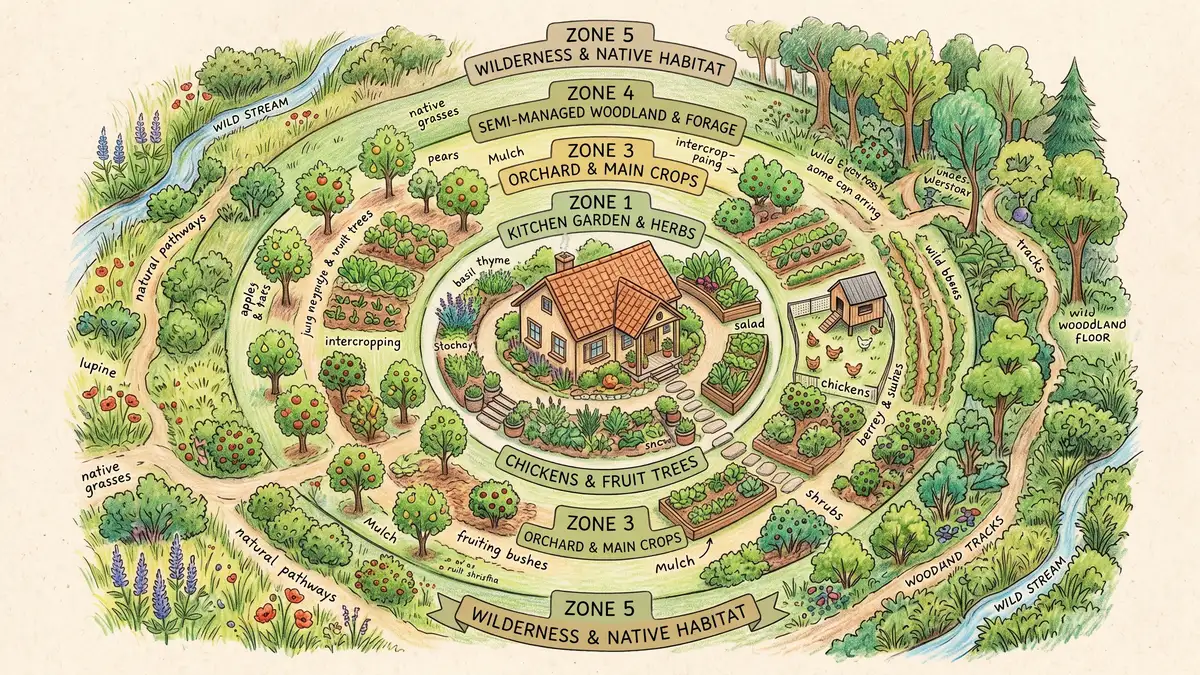
Zones arrange elements by visit frequency. Zone 1 is what you check daily — herbs, salads, the compost bin — and the Permaculture Assistant's rule of thumb keeps it tight: within 20–30 ft (6–9 m) of the kitchen door, small enough that you can weed, water, and harvest in 15 minutes. Zones radiate outward from there:
| Zone | Visit Frequency | Typical Distance | What Goes Here |
| Zone 1 | Daily | Within 30 ft (9 m) | Kitchen herbs, salad greens, compost bin, small animals |
| Zone 2 | Weekly | 30–100 ft (9–30 m) | Annual vegetables, dwarf fruit trees, chickens, greenhouse |
| Zone 3 | Monthly | 100–300 ft (30–90 m) | Main crops, standard orchard, grain, larger livestock |
| Zone 4 | Seasonally | 300 ft+ | Semi-managed woodland, timber, forage, wild food |
| Zone 5 | Rarely | Furthest edge | Unmanaged wilderness — the land's reference library |
Sources: Oregon State — Introduction to Permaculture: Zones, Permaculture Assistant — Zones.
On a 1/8-acre suburban lot, you may only have Zones 0, 1, and 2 — and that's fine. The principle scales.
Get Our Free Zone & Sector Planning Worksheet
A printable worksheet to map your own zones, sectors, and sun/wind observations — plus weekly permaculture tips from our newsletter.
Send Me the WorksheetPhase 3: Water First — Always
If there's a single rule in permaculture design, it's this: design water before you design anything else. Roads, buildings, trees, and beds all follow water logic. Get it wrong and you fight erosion, drought, or drainage for decades.
Start by calculating your potential. Brad Lancaster's rainwater harvesting rule is easy to remember: 1 inch (25 mm) of rain on 1,000 sq ft (93 m²) of catch designing for energy capturement yields roughly 623 gal (2,357 L). Multiply your roof area by your annual rainfall and you know what you can capture — it's often staggering.
Then read your slope. On any land with contour, Santa Cruz Permaculture's berms and swales guide walks through how to lay a swale perpendicular to slope so water slows, spreads, and sinks. You can mark contour with a $5 DIY A-frame level — no laser level needed for home scale. On flat ground, focus on passive earthworks around the house: a gentle basin at each downspout, mulched infiltration beds near fruit trees.
Why This Works: Catch and Store Energy
Water is energy in motion. The moment it leaves your property — through runoff, a storm drain, or evaporation — it's gone, along with the topsoil and nutrients it carried. Permaculture water design doesn't resist gravity; it cooperates with it, slowing water just enough that the land can drink before releasing what it doesn't need.
Phase 4: Design the Plan
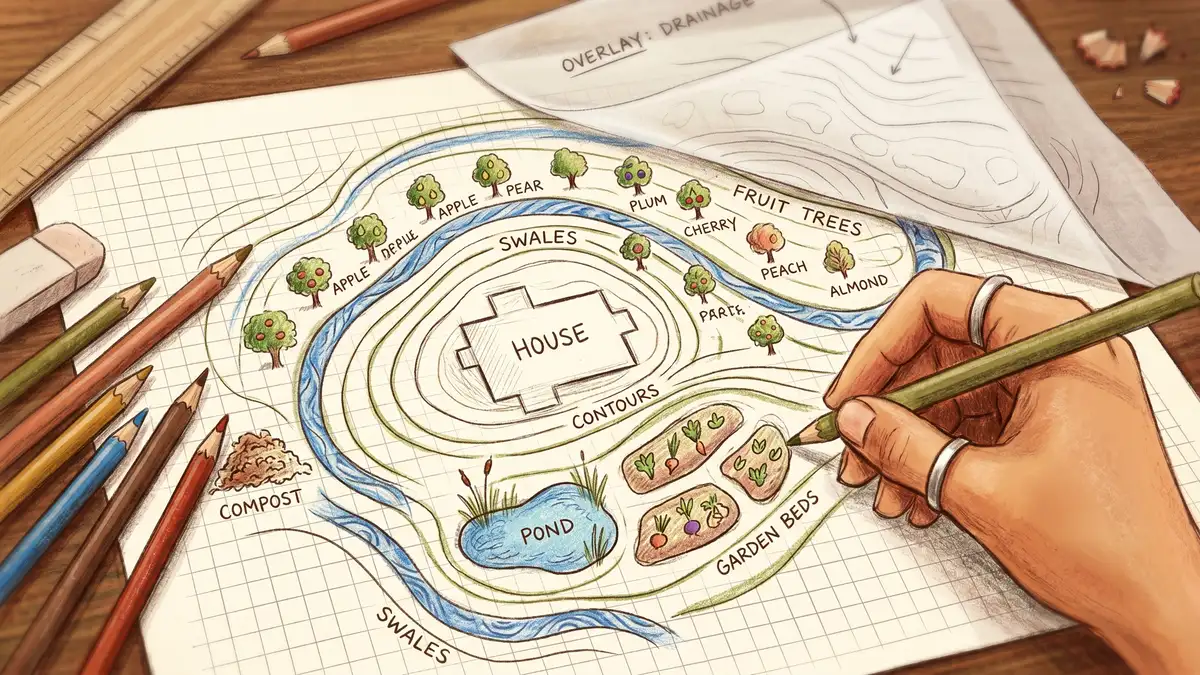
Now you draw. Start with a base map — the property outline, house, driveway, existing trees, utilities, and fence lines, drawn to scale on graph paper. Pull property data from your county assessor or Google Earth; fill soil type from the USDA Web Soil Survey and plant hardiness from the USDA Plant Hardiness Zone Map. If you want detailed topography, grab a free quad from USGS topoView.
Lay tracing paper over the base map and sketch overlays in this order: water → access → zones → structures → trees → understory → beds. Permaculture designer Darren Doherty calls this the Scales of Permanence — you design from the things hardest to change (climate, land shape, water) toward the things easiest to change (annual beds, mulch). A fruit tree planted in the wrong spot is a 20-year mistake. A lettuce bed in the wrong spot is a two-month one.
Test your soil before you commit to beds. A basic lab test is $15–30 through most state extensions, or $100 through Cornell's Soil Health Lab for a full biology panel, and Penn State Extension (and every state's equivalent) will interpret results for free. Our DIY vs. lab soil testing guide compares the options side-by-side. Your soil data shapes species selection more than your climate zone does.
Phase 5: Implement, Evaluate, Iterate
Here's the trap: you finish the plan, and you want to build it all. Don't. Break implementation into 3- to 7-year phases starting with earthworks and infrastructure (water, paths, fences, compost), then trees and shrubs in year one or two (they take longest to produce), then understory and perennial beds, then annuals last. For a 1/4-acre homestead, full build-out typically takes 3–7 years and costs $2,000–$15,000 spread across phases, depending on how much you DIY.
At the end of each season, walk the system with your original plan. Note what thrived, what struggled, and what you misread. This is where permaculture differs most sharply from conventional landscape design: the plan is a hypothesis, and the land is the experiment. If your apple tree is sulking, the soil pH might be wrong — our soil pH guide walks through testing and adjusting. If your kitchen garden is underproducing, deepen the soil with the techniques in our no-dig gardening guide and soil health guide.
If your design includes a food forest zone, expect it to look scrappy for three years before it finds its rhythm — that's normal, not a failure.
Common Beginner Mistakes
The Five Design Mistakes That Cost the Most
1. Planting before observing. You put a tree in the frost pocket. 2. Ignoring water. You build beds uphill of the swale instead of downhill. 3. Oversizing Zone 1. You make the kitchen garden 100 ft from the door and stop visiting it. 4. Importing inappropriate species. You plant a Mediterranean herb guild in zone 5b Pennsylvania. 5. Designing the entire property at once instead of phasing it. Every one of these is recoverable — but only if you catch them early.
Do You Need a PDC to Design Your Own Garden?
No. The 72-hour Permaculture Design Certificate (PDC) — the standard curriculum Mollison established — is wonderful if you want to teach, consult, or design for others, and online PDCs run $800–2,500. But designing your own 1/4-acre backyard? You can learn enough from Gaia's Garden, Oregon State's free Introduction to Permaculture, and the references at the end of this article to design confidently. A PDC accelerates your learning; it doesn't gatekeep the practice. The same is true of natural building: start small and learn by doing.
Frequently Asked Questions
How long does it take to design a permaculture garden?
Observation takes 3–12 months (a full year is ideal). Analysis and design together take another 2–3 months. So allow roughly 12–15 months from first notebook entry to first spade in the ground for a deliberate home design. Implementation then spans 3–7 years.
What are the 12 principles of permaculture?
David Holmgren's 12 principles are: observe and interact; catch and store energy; obtain a yield; apply self-regulation and accept feedback; use and value renewable resources; produce no waste; design from patterns to details; integrate rather than segregate; use small and slow solutions; use and value diversity; use edges and value the marginal; creatively use and respond to change. Our 12 principles guide explains each with garden examples.
Can I do permaculture design on a 1/8-acre suburban lot?
Yes — Eric Toensmeier and Jonathan Bates designed Paradise Lot on a 1/10-acre urban lot in Holyoke, Massachusetts, and published book-length results. Small lots usually only include Zones 0, 1, and 2, which actually simplifies design. The principles scale down cleanly.
What tools do I need to draw a permaculture design?
Minimum: graph paper, tracing paper, pencils, a measuring wheel or 100-ft tape, and a phone compass. Helpful: a cheap A-frame level ($5 DIY), an inexpensive laser level ($30–60), and free software like QGIS or Google Earth Pro. You don't need professional design software to design your own garden.
How much does a 1/4-acre permaculture system cost to build?
Budget $2,000–$15,000 spread across 3–7 years, depending on how much earthmoving you hire versus DIY, what trees you buy versus propagate, and whether you build structures like greenhouses or ponds. Most home gardeners phase costs so no single year exceeds $2,000–3,000.
What's the difference between zones and sectors?
Zones describe you — how often you visit each area. Sectors describe forces coming at the site — sun, wind, fire, noise, views. You overlay both on your base map. Zones shape what you plant where; sectors shape how you shield, capture, or channel those forces.
Key Takeaway
A good permaculture design is less about having the right plants and more about having looked carefully before you planted anything. Observe first. Design water before beds. Phase the implementation. Walk your system every season with the original plan in hand — the land will tell you what to change, if you've taken the time to learn its language.
Ready to Grow Smarter?
Get our free 20-page beginner's guide to backyard food forests. Two printable worksheets, a year-by-month food-forest calendar, and a curated reading path, plus a template for your first design.
Download the Free GuideResources
- Oregon State University — Introduction to Permaculture — free open-access textbook covering zones, sectors, scales of permanence.
- Permaculture Principles — Ethics & 12 Principles — David Holmgren's canonical framework.
- Brad Lancaster — Water Harvesting Calculations — sizing catchment, cisterns, and earthworks.
- USDA Web Soil Survey — free soil mapping for any US parcel.
- USDA Plant Hardiness Zone Map — 2023 update with more granular zones.
- Cornell Soil Health Lab — Testing Services — comprehensive soil biology panels.
- Penn State Extension — Soil Testing — low-cost lab testing and interpretation.
- SunCalc — interactive sun path calculator for any location.
- Making Permaculture Stronger — Holmgren on the Design Process — long-form interview with the co-originator.
- Whole Systems Design (Ben Falk, Vermont) — case-study-rich design practice for cold climates.
medicinal herb pharmacy in Zone 1


