

You've read about permaculture. Maybe watched a Geoff Lawton video, flipped through Toby Hemenway's Gaia's Garden, or stood in your backyard wondering how a regular suburban lawn turns into a productive food garden. The honest first answer: you don't transform it. You start with one corner, observe carefully, and build outwards over a season or two.
Permaculture isn't a weekend overhaul. It's a method of designing with your land instead of against it — and the skill that separates a thriving permaculture garden from an expensive failure is patient observation in the first 12 weeks. This guide gives you the step-by-step plan: what to observe, what to build first, what to plant, and how much it costs in real dollars and weekend hours.
Key Takeaway
Successful permaculture starts with a single 4×8 ft (1.2×2.4 m) Zone 1 bed within 25 ft (7.6 m) of your kitchen door — not a whole-yard redesign. Observe for one full season, then build small, plant perennials first, and let success expand naturally. Year 1 is investment; Year 2 onwards your garden runs on 3–5 hours a week instead of 7–10.
Step 1: Read Your Land Before You Plant Anything
Bill Mollison, the co-originator of permaculture, called this stage protracted and thoughtful observation — and the practitioner consensus, echoed by the Cornell Garden-Based Learning Introduction to Permaculture, is that 12–16 weeks across at least three seasons gives you enough data to design with confidence. For a small backyard with a known history, four to eight weeks of focused observation can be enough — but never zero.
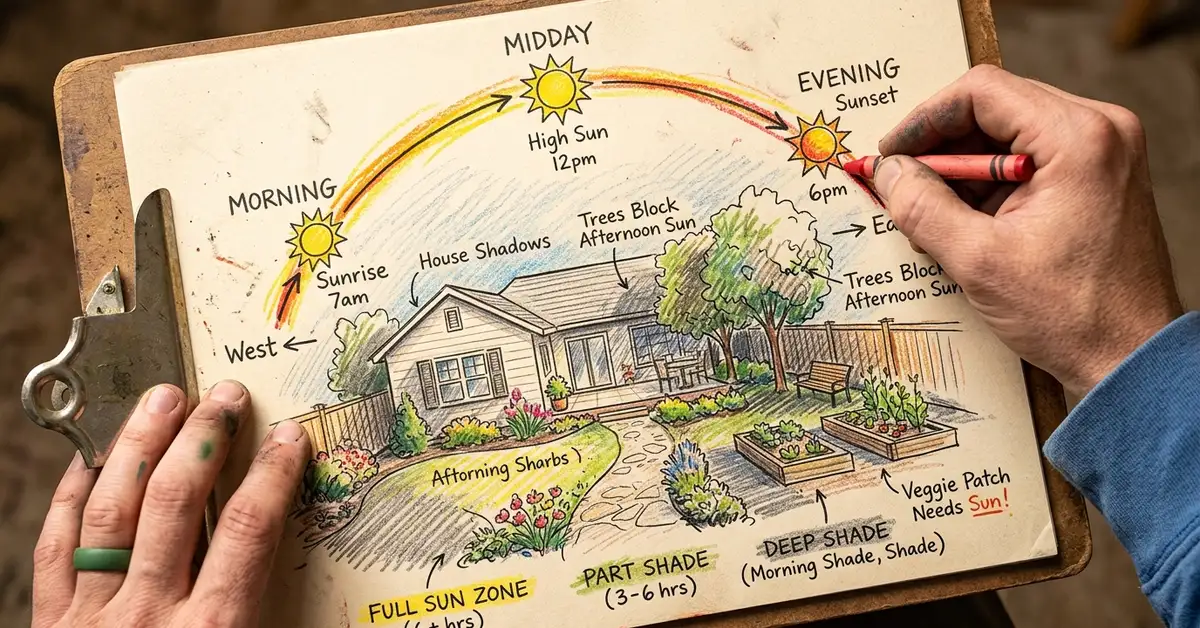
You're looking for four things: where the sun falls, where the water moves, what the soil is really like, and where your microclimates are. Each takes minutes per week, not hours.
Sun mapping (3 hours total, across one season). On a clear day, walk your property at 9 AM, noon, and 3 PM. On a sketch of the lot, mark which areas are in direct sun, partial shade, or deep shade at each time. Repeat the walk near the summer solstice, the autumn equinox, and the winter solstice — three days of work spread across the year tells you everything you need to place beds and trees correctly.
Water flow (single rainfall). After the next rain over half an inch (12.7 mm), put on boots and walk the perimeter. Mark the path water takes downhill with flags or string. Note any spot that stays soggy more than 24 hours — that's a future swale or rain garden, not a vegetable bed.
Soil texture (24 hours). Fill a jar one-third with a soil sample, top with water, shake hard, and let it settle for a day. The bottom layer is sand, middle is silt, top is clay. Equal-ish thirds is loamy — ideal. A simple jar test plus a $10 pH strip kit gives you 80% of the information a paid soil test provides.
Drainage (2–4 hours). Dig a 6-inch (15 cm) hole, fill it with water, and time how long it takes to drain. Under two hours is good. Over four hours means raised beds.
Sources:.
Step 2: Map Your Permaculture Zones

Mollison's zone system is the most practical permaculture design tool ever invented, and it solves the most common beginner mistake: putting high-maintenance plants too far from where you actually go each day. The rule is simple — distance from your back door equals how often you'll tend a plant. Plants you visit daily go closest. Plants you visit seasonally go farthest.
For a typical suburban backyard under half an acre (0.2 ha), you'll really only design Zones 1 and 2. Zones 3–5 are for homestead-scale properties.
Zone 0: The house itself. Note your back door, kitchen window view, and where the outside tap is. These three points anchor everything.
Zone 1 (0–25 ft / 0–7.6 m from your access point): This is your daily-visit area. Salad greens, perennial herbs, cut-and-come-again kale, strawberries. Anything you'd grab while cooking dinner goes here. If you only do one thing this year, build out Zone 1 properly. The Cornell permaculture introduction emphasizes that proximity equals attention — a tomato 50 ft (15 m) away is forgotten; a tomato 8 ft (2.4 m) from your back door is lunch.
Zone 2 (25–50 ft / 7.6–15.2 m): Weekly-visit area. Berry bushes, dwarf fruit trees, larger perennial vegetable beds, a small composting station. You only get here if your yard is over roughly 1,000 sq ft (93 sq m).
Sketch your zones on the same one-page map you used for sun and water. You now have a design — not a finished one, but enough to put a shovel in the ground in the right place.
Step 3: Build One Bed in One Weekend
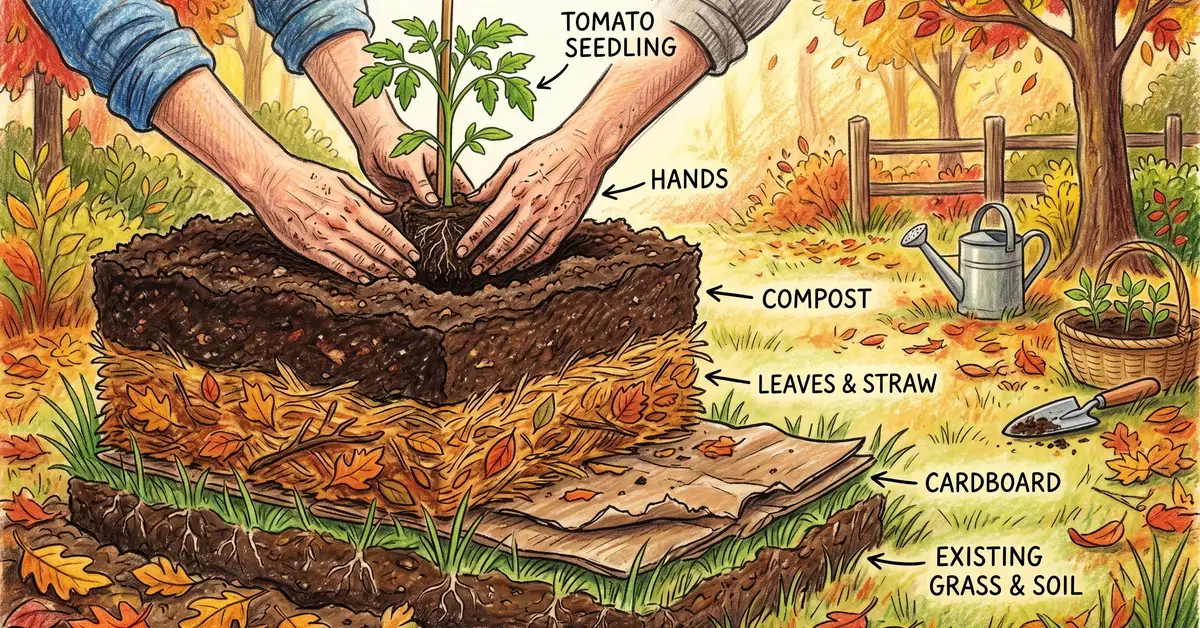
The single best first project is a 4×8 ft (1.2×2.4 m) no-dig bed, placed inside Zone 1, on a spot that gets at least 6 hours of full sun. Materials cost $45–90, labor is one weekend, and you'll be harvesting greens within 6–8 weeks. No-dig builds soil from the top down, mimicking how forest floors accumulate organic matter — and it skips the back-breaking, soil-disrupting step of double-digging.
Here's the entire weekend in four steps:
Lay the smother layer (Saturday morning, 1 hour)
Mark out 4×8 ft (1.2×2.4 m) on grass or weeds — no need to dig anything up. Lay overlapping sheets of plain cardboard, soak it with a hose, and weight the edges with stones or a few inches of soil. The cardboard suffocates the existing vegetation in 6–8 weeks and worms will pull it down for you.
Build the bed frame (Saturday afternoon, 2 hours)
Optional but recommended: a simple untreated wood frame (cedar lasts longest, untreated pine is cheaper) sets the boundary and adds 10–12 inches (25–30 cm) of depth. A 4×8 ft frame uses six 8-foot 2×10 boards. Stake the corners, screw together, set on top of the cardboard.
Layer the bed (Sunday morning, 2–3 hours)
Fill in this order: 2–3 inches (5–7.6 cm) of brown carbon (autumn leaves, straw, untreated wood chips), then 6–8 inches (15–20 cm) of compost-and-topsoil mix (60/40 ratio is ideal). Water each layer in as you go. The total volume needed is roughly 1 cubic yard (0.76 cubic m) of material.
Plant and mulch (Sunday afternoon, 1–2 hours)
Direct-seed cool-season greens (lettuce, spinach, chard) or set out transplants of strawberries, kale, and a few herbs from a local nursery. Top with 3–4 inches (7.6–10 cm) of straw or wood chip mulch — never less, or weed pressure defeats the no-dig advantage. Water deeply.
Source: USDA Gardening Advice on soil health and mulching.
One bed sounds modest. It is. That's the point. By harvesting greens from this single bed for 6 months, you'll learn more about your specific soil and climate than any book teaches — and you'll do it before committing $400 to perennial fruit trees that might fail in your microclimate.
Step 4: Plant Perennials First, Annuals Second
This is the move that most distinguishes permaculture from conventional kitchen gardening. David Holmgren — the co-founder of permaculture — built his framework around prioritizing perennials, plants that live multiple years, return more reliably each year, and require dramatically less work as they mature.
The aim, according to Holmgren and reinforced by practitioner data summarized by the USDA's Sustainable Agriculture Research and Education program, is roughly 80% perennial / 20% annual once your garden matures. You don't get there in Year 1. You start with one perennial project alongside your no-dig bed.
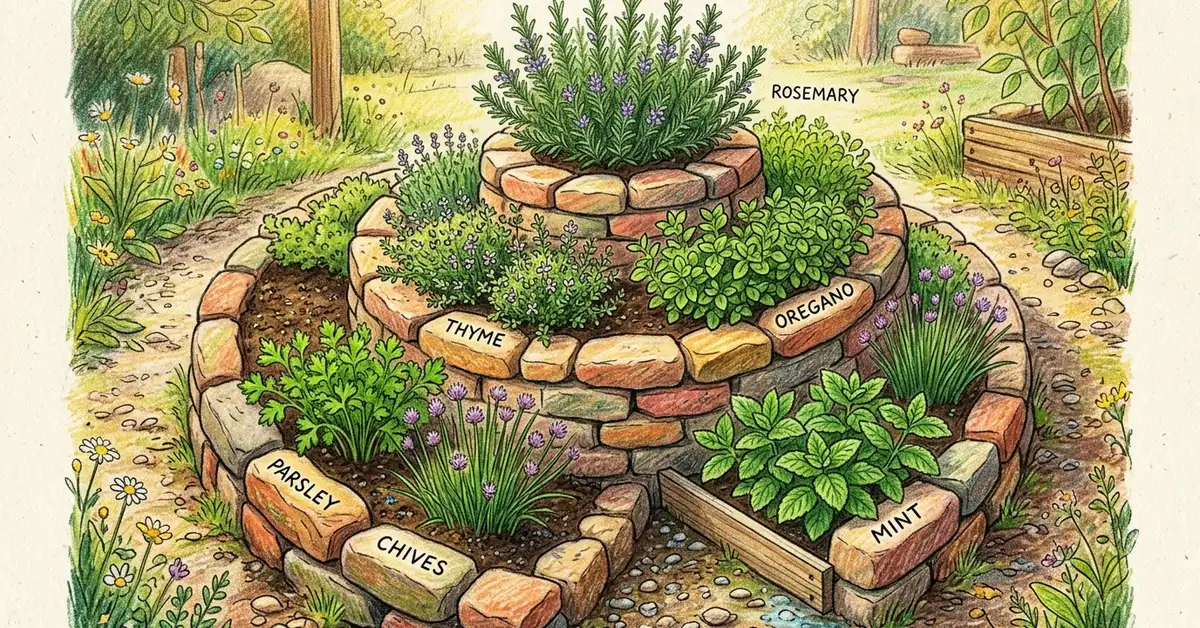
The herb spiral is the canonical first perennial project — a 3–4 ft (0.9–1.2 m) diameter mound of soil edged with stones that creates four microclimates in the space of a small kitchen table. Build cost is $35–60, labor is 4–6 hours, and you'll have a self-sustaining herb supply within 12 weeks. The Broken Ground Permaculture herb spiral guide walks through the geometry; for the practical layering, Edible SEMA's permaculture herb spiral guide covers soil and stone choices.
Plant assignments by zone within the spiral:
| Spiral Zone | Conditions | Plant Here |
| Top (dry, full sun) | Sharp drainage, hot | Rosemary, thyme, oregano |
| Mid-slope (warm sun) | Moderate moisture | Sage, marjoram, winter savory |
| Lower mid (partial sun) | Steady moisture | Chives, parsley |
| Base (semi-shade, moist) | Wettest spot | Mint (in a buried pot), sorrel |
Source:.
Beyond the spiral, the highest-return perennials for most US zones are strawberries (year-1 yield, day-neutral varieties produce all season), raspberries (canes establish year 1, fruit year 2), rhubarb (zones 3–9, lasts decades), and a single dwarf fruit tree if you have the right sun. For zone-specific cultivars, your local USDA-affiliated cooperative extension office publishes free recommendations matched to your USDA hardiness zone.
Why This Works: The Permaculture Bridge
Conventional gardening fights nature; you weed, you water on schedule, you rebuild soil every spring because tilling broke last year's structure. Permaculture works with the patterns nature already runs — the forest floor builds soil from leaf litter top-down, perennial root networks cycle nutrients without your help, and a polyculture confuses pests through chemical diversity. The four steps in this guide aren't shortcuts. They are the small set of moves that align your effort with how a healthy ecosystem already wants to behave. Mulch instead of tilling. Perennials instead of annual replants. Zone 1 instead of scattered plantings. Observation instead of design-on-paper. Your garden becomes a place that tends itself, with you as gardener instead of laborer.
What Year One Actually Looks Like

Permaculture rewards patience, but that doesn't mean you wait silently for two years. Here's what to expect across your first 12 months on a backyard scale.
| Phase | Time Investment | What You'll See |
| Pre-build (4–5 hours) | Sun, water, soil mapping | One-page site sketch; clear Zone 1 location |
| Build weekend (10–14 hours) | No-dig bed + herb spiral | Two physical projects in the ground |
| Months 2–4 (5–8 hrs/week) | Watering, light weeding, harvest | First salad harvests (50–100 g per pick); herbs ready to pinch |
| Months 5–6 (3–5 hrs/week) | Perennial maintenance, autumn planting | Strawberry runners; second-season greens; visible soil darkening |
| Months 7–12 (1–2 hrs/week) | Mulch refresh, light pruning, planning | Soil organic matter up 1–1.5%; earthworm count tripled |
Source: practitioner consensus aggregated from The Ecologist Beginner's Guide to Permaculture and Cornell Garden-Based Learning.
Want a one-page Permaculture First Steps planner?
Get the free GrowPerma planner — a printable site-observation checklist, no-dig bed material list, and Zone 1 starter plant guide. Built for weekend gardeners who want a clear plan, not a textbook.
Get the free plannerCommon Beginner Mistakes (And How to Avoid Them)
Top five Year-One failures, ranked
1) Designing the whole yard before observing for a season — plant species fail in wrong microclimates. 2) Planting Zone 2 perennials before Zone 1 is producing — distant beds get neglected. 3) Skipping mulch or going thinner than 3 inches (7.6 cm) — weed pressure undoes the no-dig advantage. 4) Underwatering newly-planted perennials in weeks 2–8 — most first-year deaths happen here, not from design flaws. 5) Putting perennials into unimproved soil — they need a 3–4 inch (7.6–10 cm) compost layer before planting or they stunt for years.
Eight of ten first-year failures trace to the first mistake on that list. The fix is structural: ban yourself from buying any perennial plant for 12 weeks while you observe. The discipline pays for itself the first time you watch a neighbor's $40 fruit tree die because they put it in the wettest corner of their yard.
The second-biggest miss is more subtle. Once your first no-dig bed is producing, the temptation is to build three more across the yard. Resist for one full season. Expand only after Zone 1 is reliable. The Permaculture Association (UK) emphasises that incremental, tested growth beats ambitious upfront design — a principle echoed by every long-form practitioner from Mollison onwards.
Frequently Asked Questions
How long does it actually take to "start" permaculture?
Honestly, one weekend to begin, but a full year to feel like you have a permaculture garden. The first weekend builds your no-dig bed and starts the observation calendar. By month six you're harvesting greens and herbs. By month twelve, soil tests show measurable improvement and your perennials are established. Most weekend gardeners report feeling "actually permacultural" around month 9–12.
What are the 12 principles of permaculture and do I need to know them all?
David Holmgren's twelve permaculture principles include observe and interact, catch and store energy, obtain a yield, apply self-regulation, use renewables, produce no waste, design from patterns to details, integrate rather than segregate, use small and slow solutions, use and value diversity, use edges, and creatively use change. You don't need to memorise them to start. Steps 1–4 in this guide apply five of them implicitly. Read the full set after Year 1 — they'll make far more sense once you have a garden to apply them to. We cover them in our 12 permaculture principles explained guide.
How much will my first year cost realistically?
A backyard-scale permaculture starter — one no-dig bed, one herb spiral, soil amendments, perennial plants, mulch, and basic tools — runs $216–417 in Year 1. Year 2 inputs drop to $35–70. Cumulative five-year cost is typically $460–690 versus $865–1,215 for a conventional annual-only garden over the same period, mostly because you stop replanting from scratch every spring.
Do I need a big yard to do permaculture?
No. Permaculture principles scale down to balconies and small patios. The herb spiral compresses to a 2 ft (0.6 m) tabletop version; the no-dig bed becomes a 12-gallon (45 L) container with the same layered build. Some of the best urban permaculture exists in 200 sq ft (18.5 sq m) of patio. Zone discipline matters more, not less, in small spaces.
Can I convert an existing vegetable garden to permaculture without starting over?
Yes — and this is the most common starting point. Stop tilling, switch to no-dig (just stop digging and add 3–4 inches / 7.6–10 cm of mulch on top). Add one perennial bed at the edge of your existing garden. Start sun and water mapping even though you've gardened the spot for years — you'll find microclimates you never noticed. Within two seasons you've effectively converted without ripping anything out. For deeper guidance on the soil-side transition, see our permaculture design first system guide.
Resources
- Cornell Garden-Based Learning — Introduction to Permaculture
- USDA People's Garden — Gardening Advice
- USDA Sustainable Agriculture Research and Education (SARE)
- USDA Urban Grower Resources — find your local extension
- USDA Climate Hubs — Permaculture, Soil & Water Conservation
- USDA NRCS — Sustainable Stewardship & Cultivating Change
- Broken Ground Permaculture — The Herb Spiral
- Edible SEMA — Permaculture and the Herb Spiral
- The Ecologist — A Beginner's Guide to Permaculture Gardening
- The Permaculture Association (UK)
- Permaculture Apprentice — Online Permaculture Resources
- Free Permaculture — How to Learn Permaculture for Free
Permaculture isn't an event you plan. It's a habit you build — observe carefully, start small, prefer perennials, and let success in Zone 1 quietly expand outward. Pick one weekend in the next month, walk your yard with a notebook, and the rest follows.
If you're brand new to the bigger picture, start with our permaculture for beginners introduction for the foundational concepts, then circle back to this guide when you're ready to put a shovel in the ground. For the design tools that come next, our permaculture design first system guide and permaculture zones explained walk through Mollison's framework in depth. And once your soil is improving, our soil health guide shows you what's happening underground.


